What is MST Display or MST monitor Daisy Chaining?
Multi-Stream Transport (MST) is a specification that allows multiple monitors to be Daisy Chain together. This capability allows Video signal to pass from the computer to monitor (1), and then to monitor (2) and more.
This capability is supported in Display Port (DP) v1.2 specification, in general, monitors that have support for daisy chain will have two DisplayPort, one in and one out. Daisy chaining monitor also requires termination of the chain. The last monitor on the chain needs to be terminated, this is done thru the OSD (monitor On Screen Display menu). If you are using a different version of the DisplayPort monitor, should always put the older DPv1.1 as the last monitor in the chain.
Please check the requirement and manuals of the monitor's daisy chaining for further instruction. Daisy chaining does have its limitation due to the amount of video on the chain. In general, the first display will be your primary display and the 2nd and 3rd displays will be cloned.
Besides the monitors, the DP cables used also must be DP version 1.2
What is DP Alt Mode for USB-C port? [#041719]
DP Alt Mode is DisplayPort Alternate Mode. DP Alt Mode is a functional extension built into SOME USB-C port. There is two types of USB-C port, with DP Alt Mode and without DP Alt Mode (only as a data port). If your system’s USB-C port comes with DP Alt Mode, it can have DisplayPort functionality for primary or secondary HDMI display. If your system’s USB-C port do not have DP Alt Mode, connecting to a video adapter with HDMI will give you a blank screen.
These DP Alt Mode carry non-USB signals and are optional capabilities unique to the USB-C connector or port, like DisplayPort or Thunderbolt 3. All Apple systems with Thunderbolt 3 can be used with USB-C with DP Alt Mode. Most USB host controller add-on card with USB-C port on Windows systems does not have DP Alt Mode function.
Please check with the system or addon card manufacturer to verify support for USB-C with DP Alt Mode capability before purchasing a USB-C adapter with HDMI port.
The Product is not work working correctly, what should I do? [#21034]
Sometime problems may occur during first installation or use, we at VantecUSA like to help you get it working to resolve the problem. We have a team of support staff that is here to help you. Please write to us first before you return the product back to the place of purchase. We are committed to help you get the product setup and working correctly. You can reach us via email at support@vantecusa.com. We will reply to you very quickly to assist you.
Best Regards,
VantecUSA Customer Service Team.
NO drivers needed for Windows 8.1/10/11 or newer OS on USB Host Controller [#020419]
Dear User,
Thank you for purchasing this USB Host controller PCIe Addon card.
These products DO NOT require any drivers if you are installing them into a system using Windows 8.1/10/11 or newer.
Microsoft Windows 8.1/10/11 or newer Operating Systems has included the necessary drivers (built-in, native drivers) in the OS.
Do not use the provided CD drivers, it is ONLY needed if you are using Windows 7 or older OS.
If you are using Windows 7 or older Operating Systems AND this card support the older OS, you may use the provided CD drivers or access the product page for your card to download the older drivers.
If you are not sure and run into a problem, please write to support@vantecusa.com for further assistance.
Windows or OS X cannot see my connected USB storage device, why? [#33405]
There are many reasons why a USB storage device will not show correctly on your System.
Here are some reason and possible solution:
1) The hard drive that you install into the USB storage is new and was not prepare to use with this System.
Solution: Use system disk tool to prepare the drive for use by initializing, partition and then formatting the drive. Once that is done, the System OS will detect the drive correctly. For help with preparing a new hard drive for use, please refer to the FAQ on "Preparing a New Hard Drive for use".
2) Your system does not have the proper drivers and requires updates.
Solution: Safely eject the USB device and Run Windows Update to ensure all drivers are up to data, before connecting USB device again.
3) The System is not seeing the USB enclosure.
Solution#1 (for self-powered enclosure): Shutdown and power OFF system, power OFF USB enclosure, disconnect the USB enclosure, turn system power back ON, log back into your system, wait for system to fully loaded all drivers, connect back the USB enclosure directly into the USB port on the computer, avoid connecting thru a hub, and finally power ON the USB enclosure.
Soultion#2 (for bus powered enclosure): Power OFF the system, disconnect the USB enclosure, power back ON system, log back into your system, wait for system to fully loaded all drivers, and now connect back the USB enclosure directly into the USB 3.0 port on the computer, avoid connecting thru a hub.
4) Under power condition and the drive is not spinning up.
Solution: If you are connected to a USB 2.0 port and the drive in the USB enclosure is not spinning up, it may be an under-powered condition. This can be cause by the drive in the enclosure drawing too much power and the one USB port is not sufficient to power the drive. Please connect to a USB 3.0 port that can provide more power to the drive in the enclosure.
5) Do not have USB 3.0 port, under power condition and the drive is not spinning.
Solution: Use a USB Y cable. If you are using a USB 2.0 enclosure, we provided a USB cable with an extra power connector (the Y) to supplement the power requirement of the device. By connecting both (Main and Supplement) USB connectors to the system, it should provide enough power for most devices to work correctly with your system. If the power requirement for the device (hard drive + enclosure) is within the specification of just one USB port, you just need to connect only the main connector.
6) System still cannot see the drive.
Solution: If the system cannot see the drive, you may want to try another computer to see if the problem is related to this computer.
7) USB DEVICE CANNOT SEE IN OS X
Solution: Try Force boot into safe mode and it will reset the USB.
Shutdown system, wait 10 seconds and restart. Right away hold down shift and will boot into safe mode.
Common Questions about UGT-ST644R RAID Controller [#05062019]
Question: What Windows OS will this card support?
Answer: This card supports Windows XP, Server 2003, Server 2008, Vista, 7, 8, 8.1, and Windows 10.
Question: Is this RAID controller compatible with my motherboard?
Answer: This RAID controller is compatible with ALL motherboard that has a PCIe x4 or better (like x8 or x16) slot. If you are using an x4 slot, make sure the x4 slot you are using has x4 functionality, not x4 slot with only x1 functionality. If you are not sure use the x8 or x16 slot on your motherboard.
Question: Where can I get the latest drivers?
Answer: You can get the latest drivers from our website here. https://www.vantecusa.com/CKEdit/images/files/ugt-st644r_v1201041.zip
Question: After installing the card and attached my boot drive to the controller, will it let me boot to Windows 7 or Windows 10?
Answer: It will not. When you move your whole boot OS that was already installed and tightly linked to the motherboard chipset and now move the same drive to a different RAID chipset on our controller, it will not boot correctly. It will not boot due to the different drivers and entry in the registry of your Windows OS. If this is a fresh install it will not be a problem. You are going to run into the same problem for any brand of controller, not just ours.
Question: The RAID will not hold the RAID configuration why?
Answer: RAID configuration is located on all the RAIDed drive and will always hold the configuration unless the customer replaces all the drives. This is actually a good feature, if the configuration is on the controller and the controller is bad, it will break the RAID. If the RAID configuration is on the drive, it will retain the RAID configuration on any one of the RAIDed drives.
Question: I install this UGT-ST644R and it boots to a blank black screen. I have tried to boot without any drive connected and different PCIe slot and getting the same result. If I remove the card, the system would boot into Windows 10. Is the card defective or it not compatible with MB or a setting that I missed?
Answer: This card is compatible with ALL motherboard that has a PCIe x4 or better slot. Please follow the steps below to make sure the card is working correctly first.
1) Ground yourself to clear any static electricity.
2) Turn the system power totally off and system power to the wall outlet is unplug for a whole minute.
2) Select a PCIe x4 or x8 or x16 slot that is not used. If it is an x4 slot, make sure it is a TRUE x4, not an x4 slot with the only x1 signal, check with your motherboard manufacturer.
3) Install the UGT-ST644R, check the slot connector is fully inserted into the slot and secure the card.
4) Plug back the power cord to the system and power the system back on.
5) Boot up and install the necessary drivers, ALWAYS download the latest drivers from vantecusa.com website product page.
6) Once the system sees the controller correctly, you may shut down and attach your drive(s).
7) If after attached your drive and the system did not boot correctly, please check with your motherboard BIOS setting to set which drive you are booting from or boot sequence.
Question: After I attach the card and reboot, will it allow me to enter BIOS before card takes over from BIOS?
Answer: Yes, this is the function of the motherboard BIOS to give you time to go into the BIOS to pick the Right Boot device.
Question: What speeds will I get considering my PCI-e x16 slot is Version 1.0?
Answer: Assuming you are using UGT-ST644R. Since your motherboard is using PCIe v1, the maximum is 250MB/s per lane theoretical speed (not actual speed)
Question: Do you have 4 or 8 lane card which will work better? If not then do you have 2 lane card.
Answer: Not 4 or 8 lanes card, the UGT-ST644R is a 2 lanes card and MUST use a TRUE PCIe x4 slot or x8 or x16. It will not work with a PCIe x4 slot with only PCIe x1 (1 lane) pins set.
Question: Will I be able to just use your controller card without using any RAID etc.?
Answer: Yes, you can use this as an individual drive SATA controller or as a RAID controller.
Question: Is the controller see the drives as SATA III drives?
Answer: Yes, it can if your SATA drive and cable is rated SATA III speed.
Question: Can I connect 6 devices, 4 internal and 2 external?
Answer: No, this is a 6 port, 4 channel card. It gives you the flexibility to use any of the 6 port but only 4 devices active at a time.
You can have 4 internal or 3 internal/1 external or 2 internal/2 external combinations. The 6 ports give you the flexibility to switch, there is only 4 channel.
Question: I recently bought your product with (2) identical Western Digital SATA 3 2TB drives. I set up the drives in a RAID-1 configuration on SATA 1 and SATA 2. The RAID works fine but the BIOS screen shows one drive using 6 Gb/s and the other using 1.5 Gb/s. Why is one drive slower than the other? Shouldn’t both show 6 Gb/s?
Answer: Check the SATA data cable connection on both sides for the one that shows running at SATA I speed. Or replace the cable to see if correct the problem.
How about switching the drive from SATA 1 and SATA 2. If it goes with the drive, you have a bad drive that is not running at the right speed.
Question: Is Windows Server 2012 R2 supported? Are the available drivers compatible with the particular OS?
Answer: Yes, it is supported on server 2012 R2 and there are compatible drivers. Here is the link. http://www.vantecusa.com/system/application/media/data_file/ugt-st644r_v1201041.zip unzip and there is only one setup, it will detect the OS and install.
Question: Would you recommend this card for RAID 10 configuration or is there a better solution for your company?
Answer: Yes, it is fine running RAID 10.
Question: The RAID method used by this card is software or hardware?
Answer: It is a hardware RAID.
Question: My motherboard is PCI-Express 2.0 specification compliant, will I still get SATA Gen III 6Gb/s speeds connection on all 4 channels of the UGT-ST644R even when it is connected to the motherboard through the PCI-Express X4 slot?
Answer: Yes, you will still be getting 6Gb/s speed on the drive.
Question: What is the actual chipset used by the UGT-ST644R card? it says Marvell BIOS, but is there a specific Marvel chip model number?
Answer: It is using Marvell 88SE9230 chipset
Question: Is the UGT-ST644R card Hackintosh compatible?
Answer: Sorry, we have not tested and do not know.
Question: Can I skip the "hardware" RAID via the UGT-ST644R card's BIOS, and set up a Windows 7 software RAID from within the Windows OS?
Answer: Yes, you can use this card as an individual SATA controller and use it as an OS software RAID, but make sure you understand that software RAID is very much slower than hardware RAID and software RAID uses more of your CPU resources and will slow down your system.
Question: Is it possible, in a single UGT-ST644R card, to create 2 separate RAID 0 or RAID 1 virtual drive? For example, can I plug 2 Hard Drives to SATA channel 1 and 2 to create a RAID 0 virtual drive, and plus 2 additional drives to SATA channel 3 & 4 to create another RAID 1 or RAID 0 virtual drive?
Answer: Yes, you can have multiple RAID on the same card. Like what you mention. Or individual drives.
Question: I set the jumpers to allow the eSATA external connections, but the card can only see 4 of the five drives.
Answer: It will only see 4 drives at a time due to the Port Multiplier (PM) function limit. The eSATA port on the UGT-ST644R only supports 1 eSATA port with PM function. That is the limitation of the Marvell chipset on this card. If you need to have 2 eSATA port with PM, you can use two cards. This has nothing to do with firmware. It is the chipset design, sorry.
Question: I purchased the Vantec UGT-ST644R to work with 2 6TB HGST drives but when the drives (or a single drive) is hooked up the card won’t POST/Boot — if I use a 4TB drive it works fine. The drives are also fine as I can use them on the motherboard directly. Is there a problem using 6TB drives?
Answer: Check the boot sequence and boot priority in the BIOS. There is not a problem using any capacity drive, it can be 4TB, 5TB, 6TB, 8TB, 10TB or 12TB as of this writing. No firmware is required.
Question: Can you use 3 identical Hard Drives for Raid 1 with the Vantec 4-Channel 6-Port SATA 6Gb/s PCIe RAID Host Card with HyperDuo Technology (UGT-ST644R)
Answer: No, RAID 1 is mirror mode and only 2 drive is allowed. There is 4 port, using 2 for the mirror, you still have the other two and you can get a software to back up what is on the mirror to it and that will make the 3rd mirror.
Question: Do you know of any reason why my Gigabyte 880GAUD3H motherboard would not detect the UGT-ST644R?
Answer: Try a different slot, some time is resources allocation issue caused by your motherboard, look into your motherboard BIOS setting to correct the problem.
Question: Does it have native drivers for Windows 10 OS?
Answer: Yes, Windows 10 native drivers support ONLY AHCI mode, it do not support RAID. To use Windows 10 with RAID function, you need to use the provided RAID drivers mention in question 3 above.
Question: Can you use two NexStar HX4 (NST-640SU3-BK) With one 4 Channel 6-Port SATA 6Gbps PCIe RAID Host Card (UGT-ST644R) for a total of 8 external Port Multiplier SATA hard drives? I do not need RAID.
Answer: Sorry, no, the UGT-ST644R card will support only one PM set of 4 drives. You need 2 cards. If you are using 2 cards, make sure you have 2 PCIe x4 or better slot.
Common Questions for NST-358SU3-BK [#05202022]

Can the 13 port hub (UGT-AH131U3-BK) or 10 port hub (UGT-AH710U3-BK) or the 7 port hub (UGT-AH710U3-BK) charge device without the computer turn on? [#11062020]
Yes, all three hubs are designed to charge the devices without the aid of a computer. You can just provide power to the hub using the provided ac adapter and it is ready to charge your devices.
Questions and Answer with step by step instruction for CB-ISA225-U3 [#33450]
DisplayLink Drivers for OS X 10.14.x only [#042219]
Here is the latest drivers for DisplayLink Chipset for OS X 10.14.x ONLY.
https://www.vantecusa.com/CKEdit/images/files/DisplayLink_v5_1_1_for_OSX10_14_x.zip
How to prepare a New Storage, Hard Drive, or SSD for use with a system? [#33406]
There are two set of instruction. One for Windows OS and another for OS X. Please use the right set of instruction for your System.
>>>>>> 1) Preparing a new hard drive for use with Windows 7/8/10 OS <<<<<<
NOTE: If you have important data on this drive, DO NOT go any further, please backup your data before you continue. These steps will erase ALL your data on the drive.
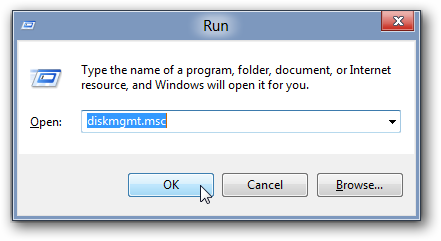
For Windows 7, hold the Windows logo key on your keyboard and press “R” (Winkey+R). This will launch the Run the utility. Type “diskmgmt.msc” inside the text box and press Enter. This will open the Windows Disk Management utility. This is where you can format, create, and delete hard drive partitions.
For Windows 8/8.1/10, hold the Windows logo key on your keyboard and press “X” (Winkey+X). This will launch a popup window and select disk management.
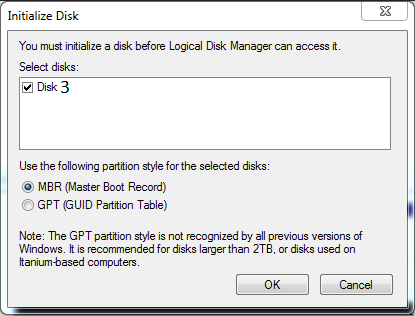
Usually, the Initialize Disk Wizard will appear automatically when you open Disk Management. If you have more than one blank drive that needs to be initialized it will list them. Make sure that there is a check in the box of the drive that needs to be initialized, select check MBR if your hard drive is smaller than 2TB, if it is greater than 2TB, please check GPT and then left-click on the Ok button. If the wizard does show up, go to step 5. If the wizard does not show up, please see the note and additional images directly below.
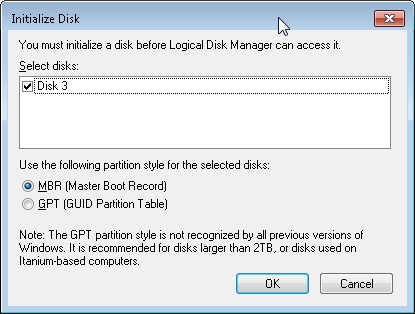
 Critical: If your hard drive is greater than 2TB in capacity, you need to use check GPT(GUID Partition Table), if it is smaller, select MBR.
 Note: If you do not see the Initialize Disk wizard, manually start the initialization. The drive that needs to be initialized should have a little circle with a red arrow pointing down like in the image below.
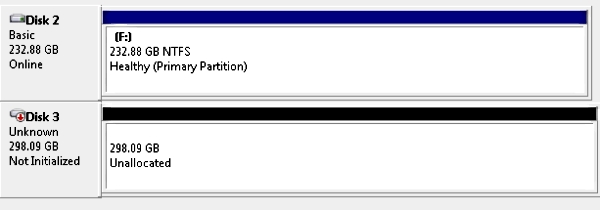
When you find it. Right-click on the red arrow and choose Initialize Disk.
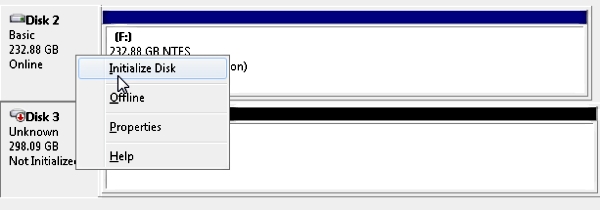
There are two mode of initializing a new drive using MBR or GPT. If your hard drive is greater than 2TB, you need to use check GPT, if it is smaller, select MBR.
The drive is now initialized. The disk should have a black bar and say that it is Unallocated. You should now be able to create a partition and format the hard drive.
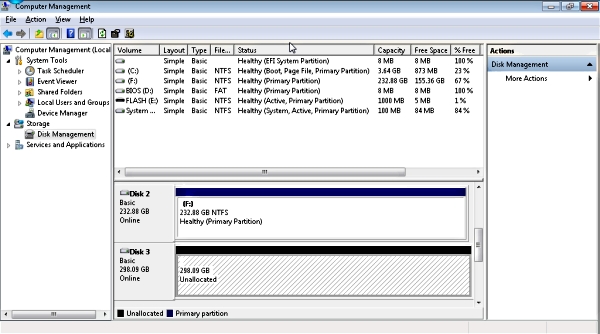
Now right click the unallocated space and click create a New Simple Volume shown below:

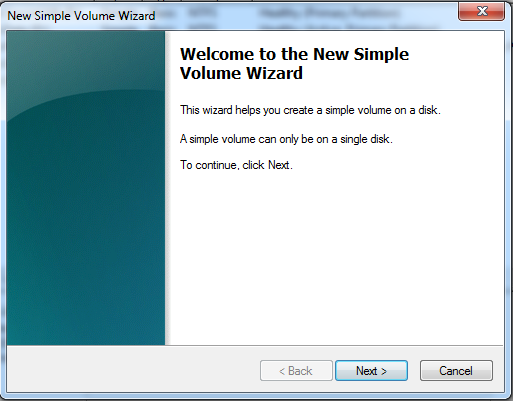
Follow the on screen wizard by clicking Next
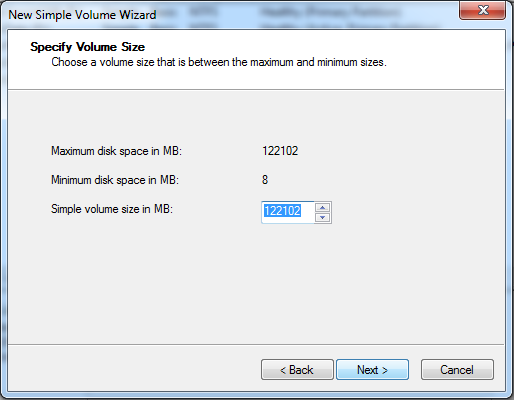
Specify your volume size, if you are not sure use the default, and now click Next
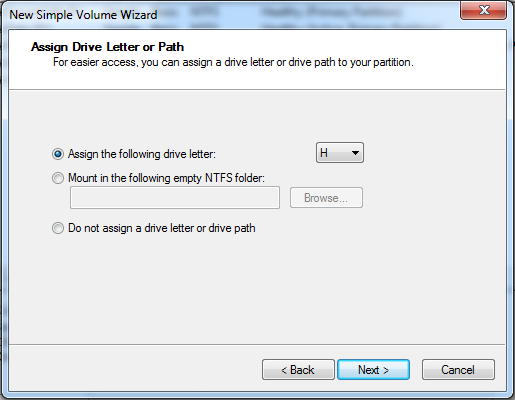
Assign a drive letter to the drive, if you are not sure use the default and click Next
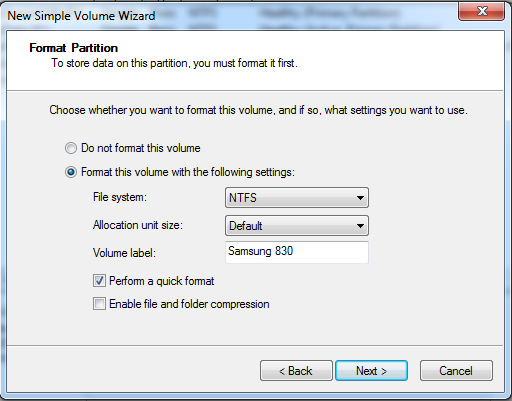
Format the partition and name the volume, if you are not sure use the default
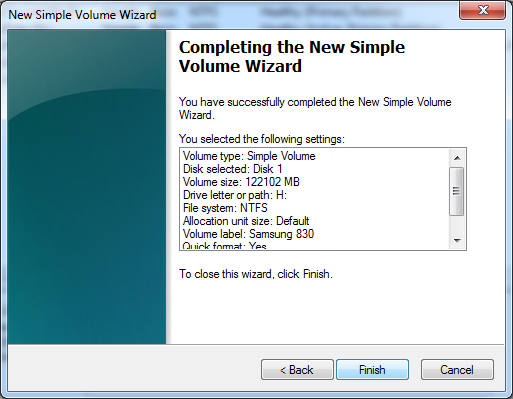
Now click Finish and it will start formatting the drive to get it ready for use.
Once the formatting is done, your system will report the presense of a new drive with an assigned drive letter. You can begin using the storage.
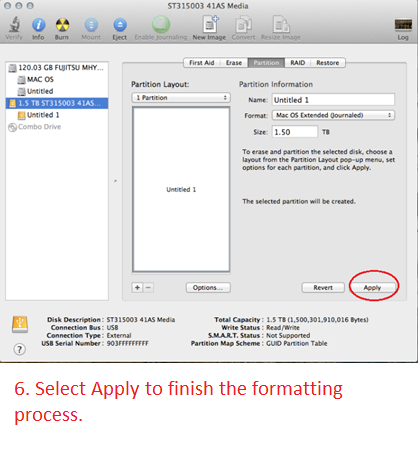
>>>>>> 2) Preparing a new hard drive for use with Apple OS X <<<<<<
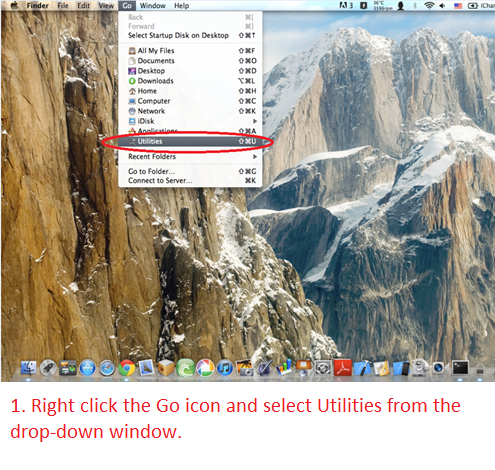
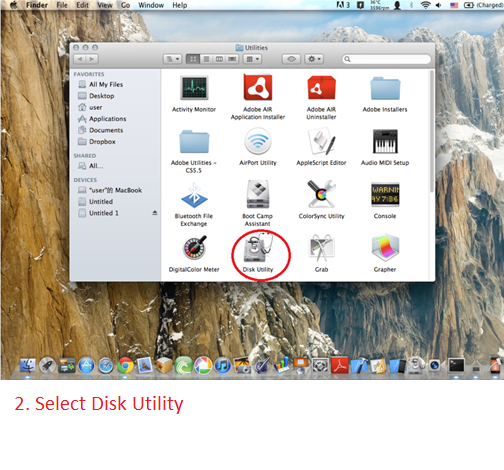
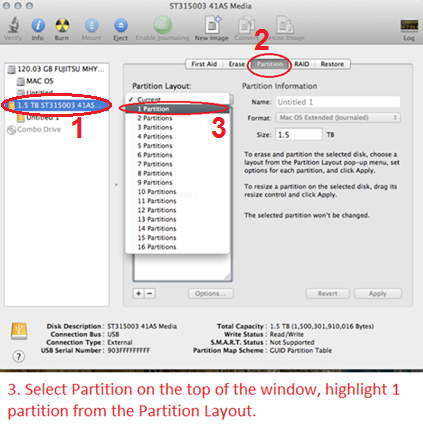
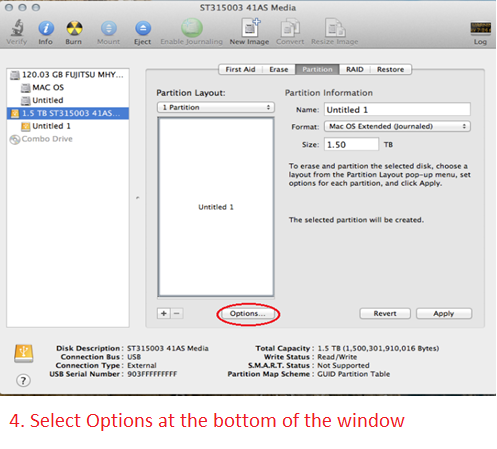
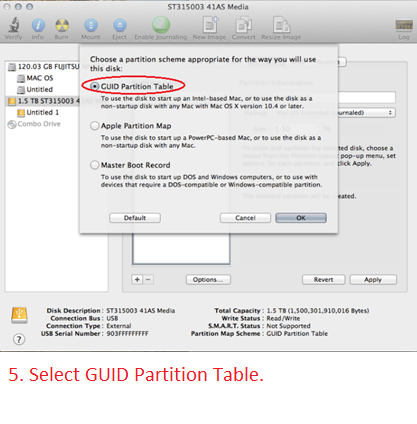
I purchase SATA/IDE to USB 2.0 Adapter [CB-ISATAU2] to attached a hard drive and I cannot see the drive, what am I doing wrong? [#33408]
The SATA/IDE to USB 2.0 Adapter is design to connect your hard drive to a USB port on your computer.
Here are some information on the connection to help you get started and troubleshoot the problem.
Select the type of drive you are using and follow the instruction closely and in this sequence to get the adapter to work.
FOR SATA (2.5” or 3.5”) drive:
1.Have everything disconnected
2.Reboot the computer
3.Follow the picture and make sure the hard drive is secure and properly connected to the device. Do not connect the USB to the computer yet.
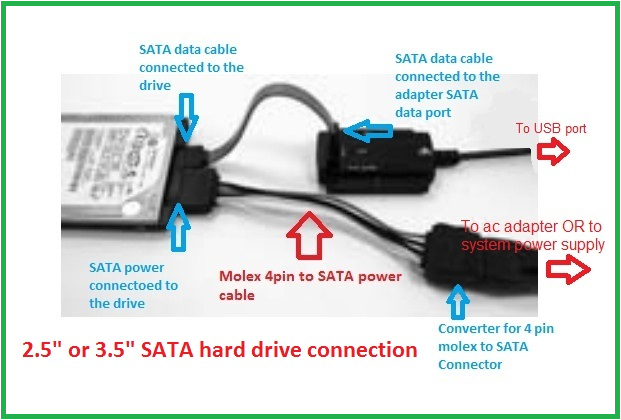
4.Proceed to connect the power to the hard drive. There are two LED on the ac adapter. One on the ac adapter and another near the Slider ON/OFF switch. See picture below.

5.Turn on the power (make sure both Green LED is ON) and let the hard drive spin up for about 20-25 seconds. (you should be able to hear the hard drive spin up).
6.. Once connected to your computer, the RED LED on the adapter will be ON.
7.Wait while the computer detects the device and automatically install USB drivers. (Sometime older drives may take as longer as 45 seconds to be detected)
8.Once the drivers are installed, the computer should see the hard drive in My Computers. (for Mac, see a USB icon of the drive on the desktop)
9. it may be your drive’s file system that was corrupted as a result you cannot read the drive in Windows Explorer.
FOR IDE (3.5”) drive:
1.Have everything disconnected
2.Reboot the computer
3.For 3.5” IDE drive, there are jumpers in the drive that may need to change for it to work correctly with this adapter. Check the instruction on the label of the drive, it should show the jumper setting for different setup like Master, Slave, CS (Cable Select) setting. Make sure the hard drive is set into MASTER Drive Mode only. Sometime in very rare cases, using is still not working correctly; you should try or Mode.
4.Follow the picture and make sure the hard drive is secure and properly connected to the device. Do not connect the USB to the computer yet.
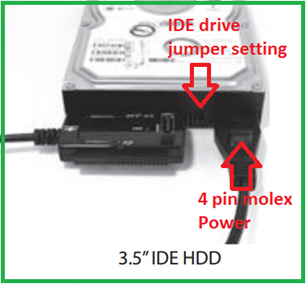
5.Proceed to connect the power to the hard drive. There are two LED on the ac adapter. One on the ac adapter and another near the Slider ON/OFF switch. See picture below.
.png)
6.Turn on the power (make sure both Green LED is ON) and let the hard drive spin up for about 25-30 seconds. (you should be able to hear the hard drive spin up)
. Once connected, the RED LED on the adapter will be ON.
7.Wait while the computer detects the device and automatically install USB drivers. (Sometime older drives may take as longer as 45 seconds to a whole minute to be detected)
8.Once the drivers are installed, the computer should see the hard drive in My Computers. (for Mac, see a USB icon of the drive on the desktop)
9. it may be your drive’s file system that was corrupted as a result you cannot read the drive in Windows Explorer.
FOR IDE (2.5”) drive:
1.Have everything disconnected
2.Reboot the computer
3.For 2.5” IDE drive, connecting it right is VERY IMPORTANT because the power pin is part of the 44 pin connection. Wrong connection will kill the disk instantly once plug in. Please be very careful.
Picture below show the UNDERSIDE of the drive and adapter. There are two sets of pins, a 4 pin and a 44 pin. The CB-ISATAU2 adapter will uses the 44 pin. The 4 pin are NOT USED. If you are still not sure, please write or call us for assistance.
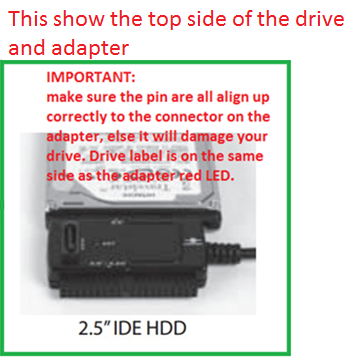

4.Follow the picture and make sure the hard drive is secure and properly connected to the device. Do not connect the USB to the computer yet.
5.Since 2.5” IDE drive is using power from the USB port, you do not need to connect the power adapter, but please use the USB port that can provide the most power to the drive.
A good way is to connect to a powered USB HUB if you have one. If not connect to the USB on the back of a desktop or tower system (avoid the front USB port).
6.Once connected to the USB port the drive should spin up and the RED LED on the adapter will be ON.
7.Wait while the computer detects the device and automatically install USB drivers. (Sometime older drives may take as longer as 45 seconds to a whole minute to be detected)
8.Once the drivers are installed, the computer should see the hard drive in My Computers. (for Mac, see a USB icon of the drive on the desktop)
9. it may be your drive’s file system that was corrupted as a result you cannot read the drive in Windows Explorer.
Troubleshooting guide for Hardware.
As for the device hardware,
Here is a troubleshooting tip to make sure that the AC adapter is working correctly:
Troubleshooting the AC Adapter: (This is what should happen in parenthesis)
1.Plug AC adapter into wall (see solid LED on AC adapter)
2.Turn on inline switch connected to the AC adapter (see solid LED on AC adapter and solid LED on switch)
3.Plug in the molex 4pin to SATA power (see solid LED on AC adapter and solid LED on switch) If the LED start blinking, this cable is shorted or bad.
4.Plug in the SATA power to the power connector on the hard drive. (See solid LED on AC adapter, solid LED on switch and the feel the drive spin up)
Troubleshooting the ISATAU2 Adapter: (This is what should happen in parenthesis)
1.All connected - AC adapter, drive except the USB to your system (NO red LED light on ISATAU2 adapter)
2.All Connected - AC adapter, drive and USB to your system (red solid LED light but not bright on ISATAU2 adapter)
3.No drive connected, just the ISATAU2 to the USB port (red solid LED light but not bright on ISATAU2 adapter)
4.All connected and drive doing transfer correctly (BRIGHT red solid LED light on ISATAU2 adapter)
Troubleshooting Guide for Software:
Check your system’s device manager under Universal Serial Bus controllers, If you see the subset list the “Standard USB Universal Host Controller”, you will have to get the correctly USB drivers for your system before continue. This device has a USB bridge chip and it need to talk to the onboard USB Chipset correctly. The “Standard” USB Chipset Drivers will not let this device work correctly. Once the drivers are updated, it will automatically see the device and work correctly.
Sometime is also because the disk is not initialized/corrupted/other format like raw/dynamic, get to the computer management console, START -> right clicking COMPUTER -> MANAGE and under STORAGE you will find DISK MANAGEMENT. From that point on you should be able to determine if the drive is there or the status of the drive.
OTHER Questions and Answers:
Q: Can I connect my CB-ISATAU2 to my USB 3.0 or USB 1.1 port?
A: Yes, the USB 2.0 connector on this adapter is backward and forward compatible with USB 1.1 and USB 3.0 port, but it will only performance at USB 2.0 or slower speed depending on the speed of the port.
Q: I took a hard drive out of an older notebook but the interface is different from what is available to connect the adapter, how can I get it to work?
A: Some notebook manufacturer uses an adapter interface to connect the hard drive to the notebook. If you remove the adapter interface you will see the standard SATA or IDE interface to connect to this CB-ISATAU2 adapter.
Q: How do I get power to the 2.5” IDE hard drive when there is not power connector?
A: The 2.5” IDE hard drive gets it power from the USB 2.0 port on your computer. If your 2.5" drive power requirement exceed the provided power from the USB 2.0 port, it will cause the drive not to recognize correctly. Please use an external powered USB Hub for the 2.5” IDE drive to work correctly.
Q: What type of symptom will I get if the drive is under powered?
A: You may see problems like not able to see the drive, asking you to format the drive, drive spinning up and down, clicking sound or disconnection symptom.
Q: Will this CB-ISATAU2 work on my Mac?
A: Yes, it will work your Mac OS X 10.6 or newer.
Q: Can I use the CB-ISATAU2 as a boot device?
A: No, it will not work as a boot device.
Q: Why is Windows Operating System asking me “Do you want to format this drive”, I have important data on the drive that I want to retrieve. What can I do?
A: If you have important data on the hard drive, do not format the drive. Windows OS try’s to read the data and could not read it due to file corruption or unknown format; it will then ask if you want to format this drive. Please answer NO and use data recovery software to recover your data.
Q: Can this CB-ISATAU2 read other file systems format?
A: The CB-ISATAU2 can read other file systems format if the computer it is connected to can read the format of the drive.
Q: My old computer cannot boot and I took the drive out. I then connect it to the CB-ISATAU2 adapter and try to retrieve the data using my new computer and it is saying “access denied”. What is wrong?
A: Due to security reason, you do not have rights to the data on the old computer. You can access the data by taking ownership of the data so that you can get your data back. You can search on the web for instructions on how to take ownership of files or folders.
Q: Will the CB-ISATAU2 work with Advanced Format (4Ksector) Drives?
A: No, it will not work with Advanced Format (4K sector) Drives. We do have other product that will like CB-ISA200-U3 or CB-ISATAU3.
Q: My computer crush and I cannot boot to Windows. Can I use this CB-ISATAU2 to retrieve the data on the hard drive?
A: It depends on the cause of the computer crush. If the crush is cause by files corruption or other software problem not related to the hard drive, you should be able to retrieve the data. If it is cause by the hardware of the hard drive, you may not be able to retrieve any data using the CB-ISATAU2.
Q: Will the CB-ISATAU2 works with my Windows 8/8.1/10 OS?
A: Yes, it will work correctly for Windows 8/8.1/10 OS
Q: I have other questions that is not listed here, what can I do?
A: If you are located in the USA/Canada, you can email our support representative using the Contact Us section of the website
About Warranty, Repair process (RMA), RMA closed status, and Register product [#33410]
All our standard products comes with 1 year warranty. Some special products may have longer warranty, please check the product page for more information.
If you have questions about our product, please contact our support team for assistance. You can reach them via the contact form located in Menu "About Us", select the Region and select "Product Support". They are very helpful and can answer and assist with our products.
Here are the steps for warranty repair. You can use this link below or you can contact RMA our website main page, select Support pull down menu and pick RMA Center. In the RMA Center page select Warranty Service, "End User" to begin.
https://www.vantecusa.com/rma.php
1) Submit the online RMA request above.
2) Wait for the RMA to be approved. You will get notification of the approval via email. (Check your spam folder if it did not show within 2 hours.)
3) Follow the instruction in the RMA email. Pack well and send back the defective unit. (You pay for shipping to us)
4) We wait for the unit to arrive.
5) Once here, we replace the unit and send replacement unit back to you. (We pay for shipping to you)
6) RMA case close.
You do not need to register the product. For warranty purpose we require the invoice or proof of purchase.
You can do the following:
If you purchase it from a store and have the physical receipt, take a clear picture of the receipt, email to yourself and save it in your email warranty folder (create one if you do not have one).
If you purchase it online, you can save the invoice email to your email warranty folder.
If you purchase online, the online store may have your purchase history that may help.
With this you will have a central place for all your receipts.
All products warranty is for one year, if you do not need them any more after a year clear that email.
Where can I download Drivers for your USB Storage product? [#33409]
USB Enclosures:
All our USB enclosures do not need any drivers. It is plug and play. All our USB enclosures uses the USB client drivers that are already built in to the OS (XP, Vista, 7, 8, 8.1, 10, OS X 10.6 or newer). As long as your computer USB Host controller drivers is install correctly and is working, when you connect our enclosures to your computer, the OS will sense the USB storage and load the correct drivers automatically for you.
USB Adapters:
USB adapter does not need any drivers. It is plug and play. It uses the USB client drivers that are already built in to the OS (XP, Vista, 7, 8, 8.1, 10, OS X 10.6 or newer). As long as your computer USB Host controller drivers is install correctly and is working, when you connect the drive to this adapter to your computer, the OS will sense the USB storage and load the correct drivers automatically for you.
USB Docks:
All our USB docks do not need any drivers. It is plug and play. All our USB docks use the USB client drivers that are already built in to the OS (XP, Vista, 7, 8, 8.1, 10, OS X 10.6 or newer). As long as your computer USB Host controller drivers is install correctly and is working, when you connect our docks to your computer, the OS will sense the USB storage and load the correct drivers automatically for you.
USB display adapter sleep and remain dark, will not wake up in Windows 10 [#1218a18]
Sometime Windows is shutting down the USB Root Hub on your system to save power, that may be the cause of the monitor issue not waking up correctly. You can correct the problem by doing the following changes.
Go into Windows 10 "Setting" > "Power and Sleep" > on right side "Additional power setting"
Change EVERY plans setting one at a time. If you have Balanced, High Performance, Powert Saver or others:
Select "Change plan settings" on the right of each > "Change advanced power settings" > "USB setting" > "USB selective suspend setting" > change setting to "DISABLE"
Done one, now do for all the rest (Balanced, High Performance, Powert Saver or others). After changing all, restart computer.
