Logo
  • EN
  • 繁
  • Products
    • Hard Drive Enclosures
      • 2.5" Enclosures
      • 3.5" Enclosures
      • Hard Drive Docks
      • Optical Disk Enclosures
    • Hard Drive Accessories
      • Hard Drive Adapters
      • Converters
      • Mobile Racks
      • Mounting Brackets
    • Audio + Video
      • Adapters
      • Converters
      • Docking stations
      • Headphones
    • Mobile Accessories
      • Stabilizer
    • Add-on Cards
      • Add-on I/O
      • Firewire
      • Serial ATA
      • Sound
      • USB
      • Network
    • Accessories
      • Cables
      • Card Readers
      • Hubs
      • Mobile
      • Network
      • USB Charging
      • USB I/O
      • Computer Accessories
    • Cooling
      • Case Fans
      • HDD Cooler
      • Laptop Cooler
      • System Cooler
    • Industrial Products
      • Industrial Hubs
      • Industrial Add-on Cards
    • Nvidia Accessories
      • Cables Accessories
  • Support
    • FAQ
      • Frequently Asked Questions
      • Knowledge Base
    • Media Center
    • Download Center
    • Where To Buy
    • RMA Center
  • About Us
    • Who We Are
    • Sitemap
    • Contact
  •  Products   FAQ
Home / Products / Hard Drive Enclosures / Hard Drive Docks / NexStar SX, USB 3.1 Gen 2 Type C M.2 NVMe SSD Dock
  • NexStar SX, USB 3.1 Gen 2 Type C M.2 NVMe SSD Dock

    NST-D208C3-BK

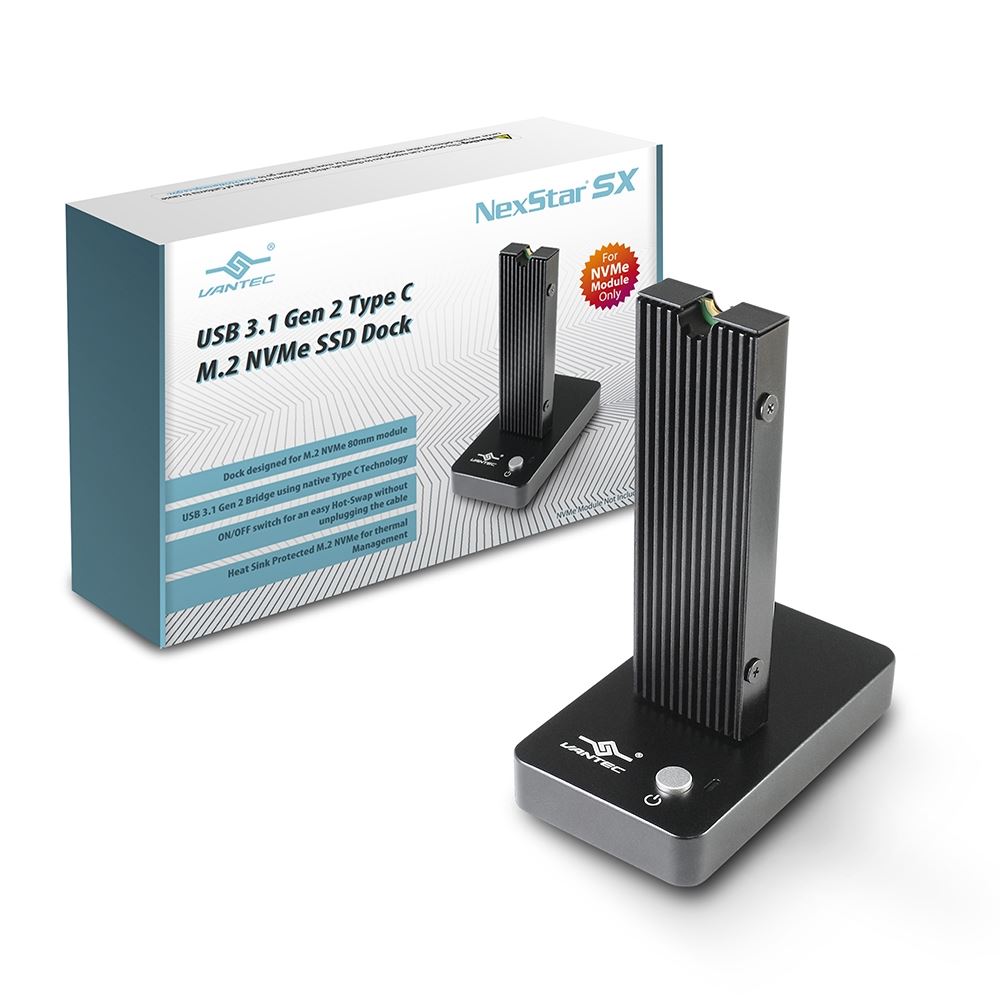
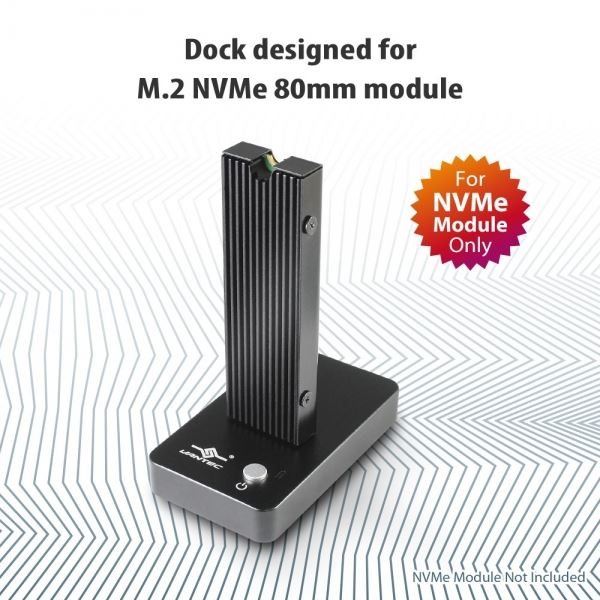
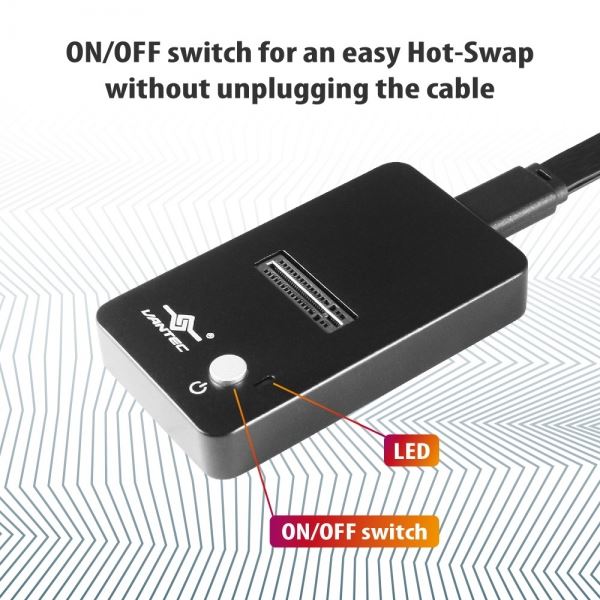
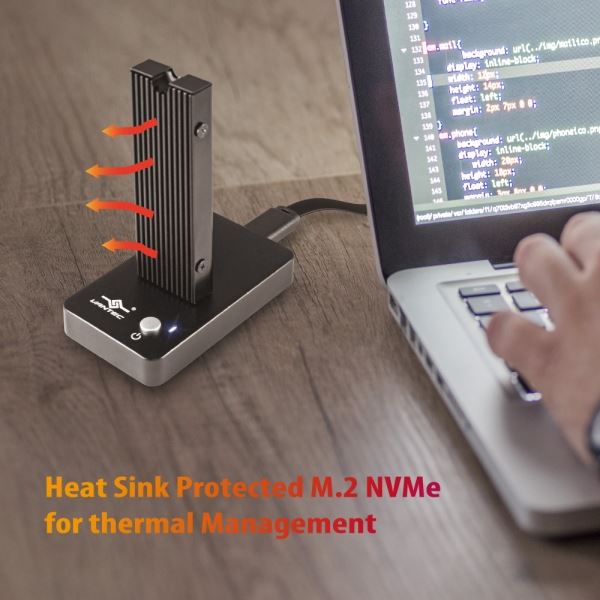
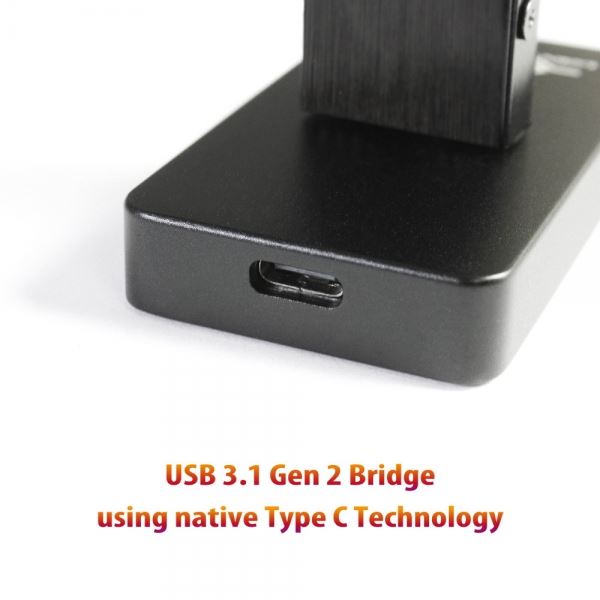
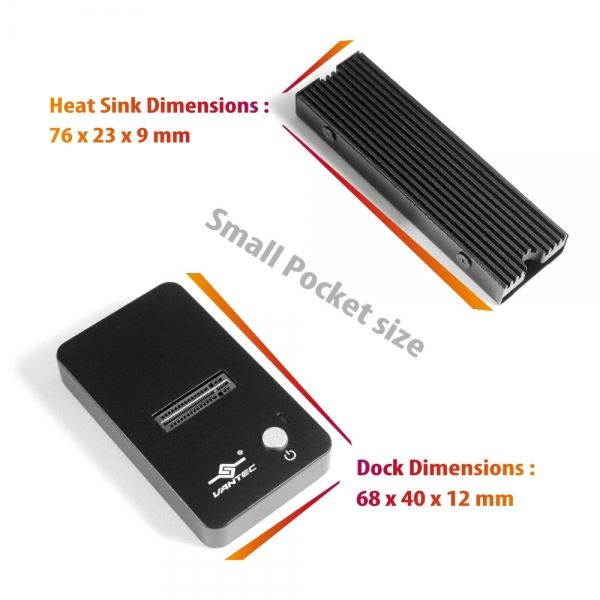
    The USB 3.1 Gen 2 Type C M.2 NVMe SSD Dock is another addition to the NexStar SX Series specially design for Users that have the need for ultra-fast storage at the same time have the need to swap multiple NVMe storage device. The dock base comes with ON/OFF switch, M.2 NVMe dock port, and a native USB C port. It is very simple to use, just plug in the Thermal protected NVMe into the dock and power it ON and it is ready to work. It also comes with an additional set of Thermal Heat Sink Kit. This dock is powered with a Gen 2 USB bridge for 10Gbps (theoretical speed). If there is a need for ultra-fast speed, this is the dock to get it done using this Vantec M.2 NVMe SSD Dock.


    BUY NOW
    • fb
    • g+
    • tt


  • Highlight
  • Spec
  • Support
  • FAQ
  •  

    • Designed for M.2 NVMe module
    • Dock Designed for Hot Swapping
    • ON/OFF switch for an easy swap without unplugging the cable
    • Heat Sink Protected M.2 NVMe for thermal Management
    • Design for Ultra-Fast data storage and transfer
    • USB 3.1 Gen 2 Bridge using native Type C Technology
    • Support USB Attached SCSI Protocol (UASP) function
Model: NST-D208C3-BK
 
M.2 Connector:    M.2 NVMe M-Key 
USB Connector:    USB Type C (reversible connector)
USB Bridge:    USB 3.1 Gen 2 (10Gbps theoretical speed) 
Power:    Bus-Powered, no external power needed 
Material:    Aluminum, ABS Plastic
Dock Dimensions (LxWxH):    2.7 x 1.7 x 0.5 inches / 68 x 40 x 12 mm
Dock Weight:    1.6 oz. / 45g
Heat Sink Dimensions (LxWxH):    3 x 0.9 x 0.4 inches / 76 x 23 x 9 mm
Heat Sink Weight:    0.8 oz. / 23g
USB Cable:    USB C to C / C to A cable
Cable length:    11.8 inches / 300mm
OS Support:    Windows 10, 8, 7; Apple OS X 10.10 or greater; Linux 
 
System Requirements:

USB Type C or A port
M.2 NVMe Module


What's included: NVMe Dock, 2 x heat sink, USB C to C / C to A cable,  2 x set Screws kit and thermal pad, Quick Install Guide
 
EAN: 4716872103621 
UPC: 844767023175
   
Environmental:
Operating Temperature 0 ℃ to +45℃
Operating Humidity 10% to 85 % RH (no condensation)
Storage Temperature -10℃ to +70℃
Storage Humidity 5% to 90% RH (no condensation)

Driver

Manual

Will your M.2 NVMe product support NVMe Module with B+M Key (PCIe Gen 3 x2)? [#12232019]

  • Yes, All our M.2 NVMe Enclosures supports NVMe Module both M Key (PCIe Gen3 x4) or B+M Key (PCIe Gen3 x2). Example of NVMe with B+M Key is the WD Blue SN500 NVMe SSD, Part# WDS250G1B0C, WDS500G1B0C.

    Please do not get confuse M.2 NVMe B+M Key with M.2 SSD B+M Key. M.2 SSD Module will not function in the NVMe enclosure or on the NVMe add-on card.

    Yes, All our M.2 NVMe Add-on Card supports NVMe Module both M Key (PCIe Gen3 x4) or B+M Key (PCIe Gen3 x2) too.

    If you are not sure write to support@vantecusa.com for assistance.


Is Vantec USB Enclosures/Docks compatible with Windows 10 operating system? [#33401]

  • Yes, all our USB Enclosures and Docks are compatible with Windows 10 Operating System. Just plug into any USB port on your Windows 10 system and it should function just like your older OS. You do not need to update any firmware or drivers. It is plug and play.

The Product is not work working correctly, what should I do? [#21034]

  • Sometime problems may occur during first installation or use, we at VantecUSA like to help you get it working to resolve the problem. We have a team of support staff that is here to help you. Please write to us first before you return the product back to the place of purchase. We are committed to help you get the product setup and working correctly. You can reach us via email at support@vantecusa.com. We will reply to you very quickly to assist you.

    It is always a pleasure assisting our customer solve and resolve problems related to our products.

    Thank you for looking into our products. We do value your patronage. porno


    Best Regards,

    VantecUSA Customer Service Team.


How to use C to C or C to A USB cable on some enclosure that comes with these cable [#03042020]

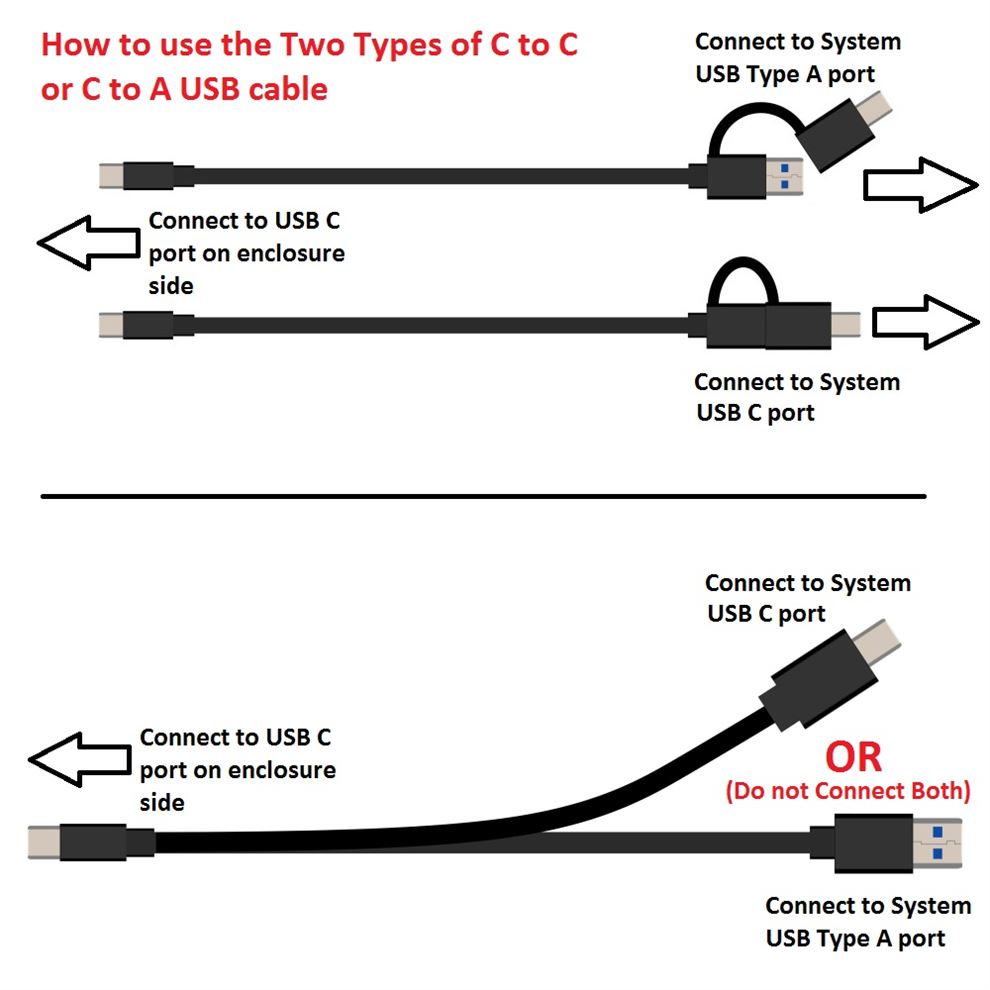
  • Some enclosures you purchase may come with the following USB cable shown below or Dual cable.

    For USB cable shown below, the right way to connect the cable is to plug the single USB C to the enclosure first
    and the other end to your system USB port shown. Do not reverse the connection, it may not work.  

    For Dual cable (two cable, C to C and C to A) the right way to connect the cable is to see what type or port is available
    on your system and use the C to C or C to A. First plug the single USB C to the enclosure and the other end to your system USB port


How to prepare a New Storage, Hard Drive, or SSD for use with a system? [#33406]

  • There are two set of instruction. One for Windows OS and another for OS X. Please use the right set of instruction for your System.


    >>>>>> 1) Preparing a new hard drive for use with Windows 7/8/10 OS <<<<<<


    NOTE: If you have important data on this drive, DO NOT go any further, please backup your data before you continue. These steps will erase ALL your data on the drive.


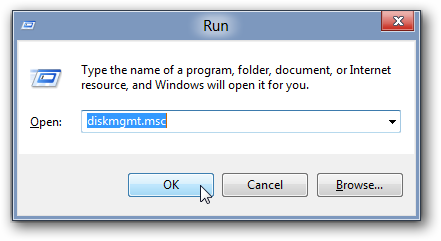
    For Windows 7, hold the Windows logo key on your keyboard and press “R” (Winkey+R). This will launch the Run the utility. Type “diskmgmt.msc” inside the text box and press Enter. This will open the Windows Disk Management utility. This is where you can format, create, and delete hard drive partitions.


    For Windows 8/8.1/10, hold the Windows logo key on your keyboard and press “X” (Winkey+X). This will launch a popup window and select disk management.


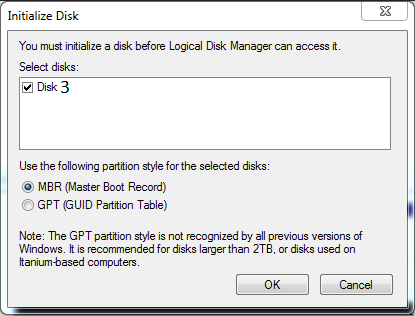
    Usually, the Initialize Disk Wizard will appear automatically when you open Disk Management. If you have more than one blank drive that needs to be initialized it will list them. Make sure that there is a check in the box of the drive that needs to be initialized, select check MBR if your hard drive is smaller than 2TB, if it is greater than 2TB, please check GPT and then left-click on the Ok button. If the wizard does show up, go to step 5. If the wizard does not show up, please see the note and additional images directly below.


    STOP   
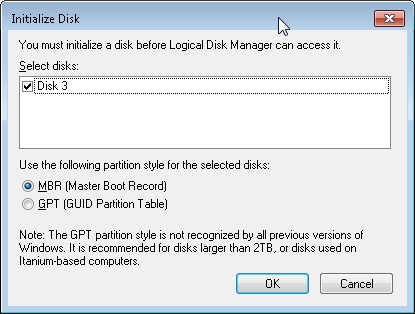
Critical: If your hard drive is greater than 2TB in capacity, you need to use check GPT(GUID Partition Table), if it is smaller, select MBR. 


    NOTE
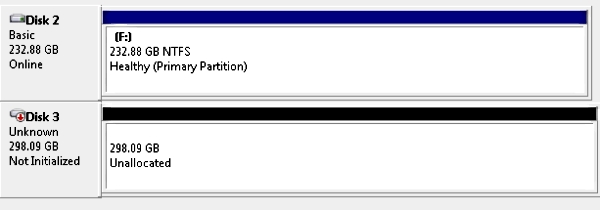
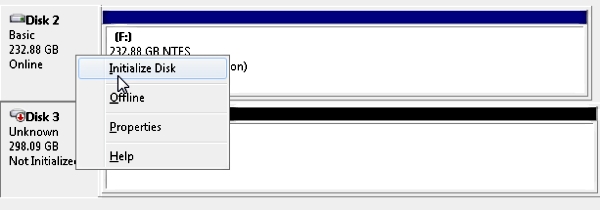
Note: If you do not see the Initialize Disk wizard, manually start the initialization. The drive that needs to be initialized should have a little circle with a red arrow pointing down like in the image below.


    Image


    When you find it. Right-click on the red arrow and choose Initialize Disk.


    Image


    There are two mode of initializing a new drive using MBR or GPT. If your hard drive is greater than 2TB, you need to use check GPT, if it is smaller, select MBR.


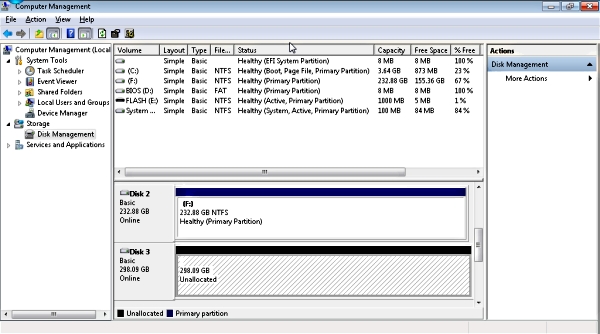
    The drive is now initialized. The disk should have a black bar and say that it is Unallocated. You should now be able to create a partition and format the hard drive.


    Image


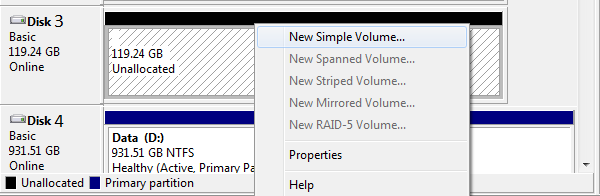
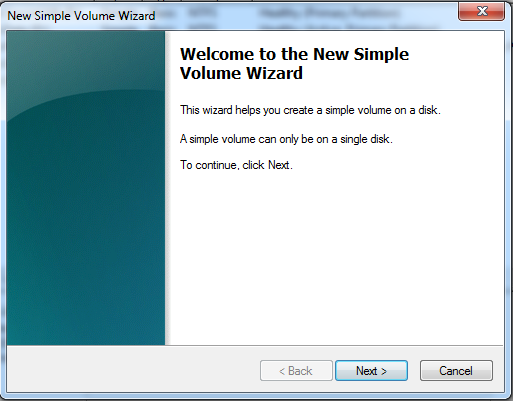
    Now right click the unallocated space and click create a New Simple Volume shown below:


    Follow the on screen wizard by clicking Next


    6140ced0ed5c4af9bb3f4e2.png


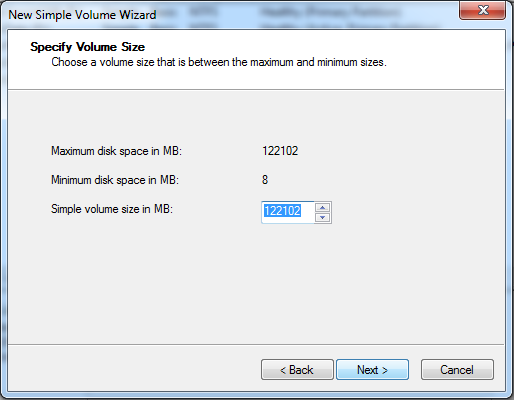
    Specify your volume size, if you are not sure use the default, and now click Next


    d12075fe11cf486a8c71aaf.png


    Assign a drive letter to the drive, if you are not sure use the default and click Next


    584018838e134ecea7380b0.png


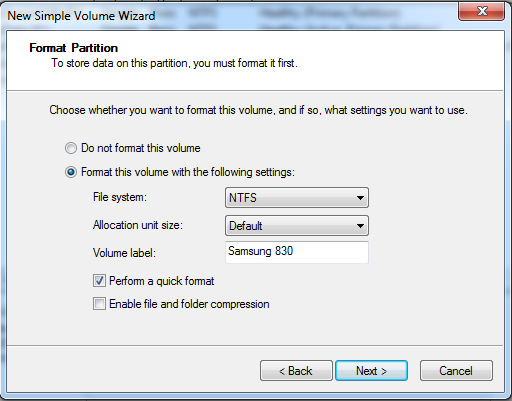
    Format the partition and name the volume, if you are not sure use the default


    7f18d8fde76b4e2a842e50e.png


    Now click Finish and it will start formatting the drive to get it ready for use.


    647d38c3616c4b1fb67fdc0.png


    Once the formatting is done, your system will report the presense of a new drive with an assigned drive letter. You can begin using the storage.


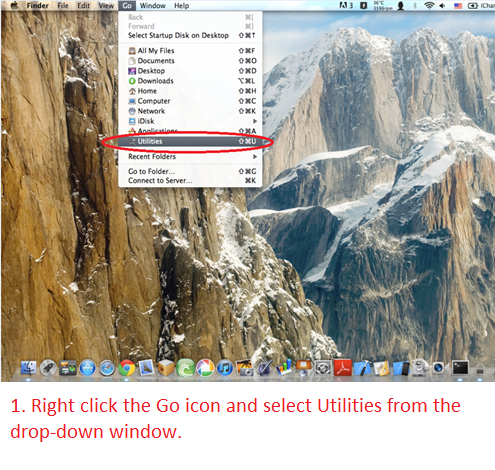
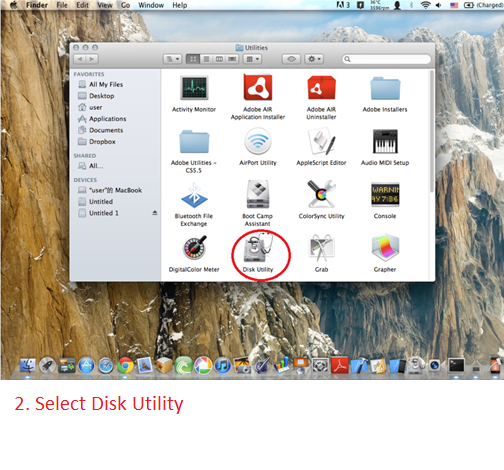
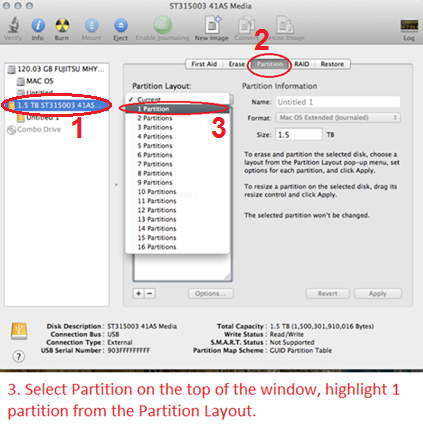
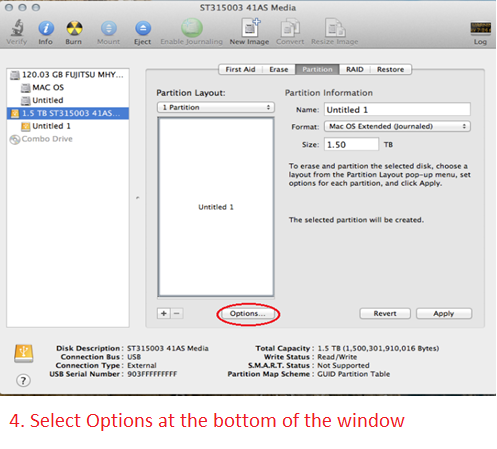
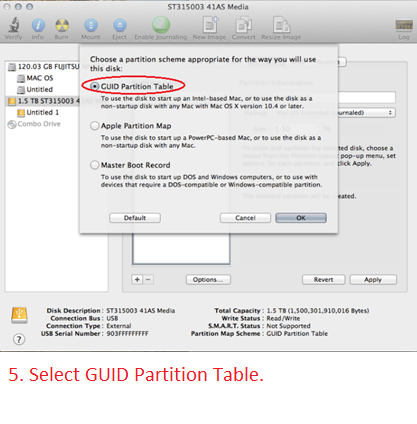
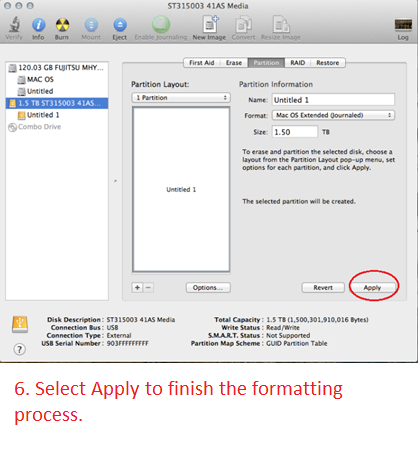
    >>>>>> 2) Preparing a new hard drive for use with Apple OS X <<<<<<


Where can I download Drivers for your USB Storage product? [#33409]

  • USB Enclosures:

    All our USB enclosures do not need any drivers. It is plug and play. All our USB enclosures uses the USB client drivers that are already built in to the OS (XP, Vista, 7, 8, 8.1, 10, OS X 10.6 or newer). As long as your computer USB Host controller drivers is install correctly and is working, when you connect our enclosures to your computer, the OS will sense the USB storage and load the correct drivers automatically for you.


    USB Adapters:

    USB adapter does not need any drivers. It is plug and play. It uses the USB client drivers that are already built in to the OS (XP, Vista, 7, 8, 8.1, 10, OS X 10.6 or newer). As long as your computer USB Host controller drivers is install correctly and is working, when you connect the drive to this adapter to your computer, the OS will sense the USB storage and load the correct drivers automatically for you.


    USB Docks:

    All our USB docks do not need any drivers. It is plug and play. All our USB docks use the USB client drivers that are already built in to the OS (XP, Vista, 7, 8, 8.1, 10, OS X 10.6 or newer). As long as your computer USB Host controller drivers is install correctly and is working, when you connect our docks to your computer, the OS will sense the USB storage and load the correct drivers automatically for you.


About Warranty, Repair process (RMA), RMA closed status, and Register product [#33410]

  • About warranty:

    All our standard products comes with 1 year warranty. Some special products may have longer warranty, please check the product page for more information.

    If you have questions about our product, please contact our support team for assistance. You can reach them via the contact form located in Menu "About Us", select the Region and select "Product Support". They are very helpful and can answer and assist with our products.


    Here are the steps for warranty repair. You can use this link below or you can contact RMA our website main page, select Support pull down menu and pick RMA Center. In the RMA Center page select Warranty Service, "End User" to begin.

    https://www.vantecusa.com/rma.php

    Normal RMA returns for repair.

    1)            Submit the online RMA request above.
    2)            Wait for the RMA to be approved. You will get notification of the approval via email. (Check your spam folder if it did not show within 2 hours.)
    3)            Follow the instruction in the RMA email. Pack well and send back the defective unit. (You pay for shipping to us)
    4)            We wait for the unit to arrive.
    5)            Once here, we replace the unit and send replacement unit back to you. (We pay for shipping to you)
    6)            RMA case close.


    Register Products:

    You do not need to register the product. For warranty purpose we require the invoice or proof of purchase.

    You can do the following:

    If you purchase it from a store and have the physical receipt, take a clear picture of the receipt, email to yourself and save it in your email warranty folder (create one if you do not have one).
    If you purchase it online, you can save the invoice email to your email warranty folder.
    If you purchase online, the online store may have your purchase history that may help.

    With this you will have a central place for all your receipts.

    All products warranty is for one year, if you do not need them any more after a year clear that email.


Warranty replacement process [#33413]

  • Here are the steps when requesting for warranty replacement:

    1) Start the RMA process.

         We offer 1 year warranty for this product. If it is within 1 year, you can contact RMA through our website using the Online RMA link.


          https://www.vantecusa.com/rma.php


         After submitting, you should get an approval within 24 hours (check your spam folder, to make sure it did not end up in the spam folder)


    2) After you have gotten the RMA number, follow the instruction in the approval email, the prep the unit and send it back to us (you pay for shipping back to us).


    3) Once we have received the defective unit, we replace the unit and send it back. (we pay for shipping back to you).


    4) You can check on the status of this process by emailing to rma@vantecusa.com for more information on the status.

  • Follow us for all the latest news, tips and updates.

    • Shop Vantec
    • Privacy Policy
    • Term of Use
    • Contact
  • © 2017 Vantec Thermal Technologies.
Top