Logo
  • EN
  • 繁
  • Products
    • Hard Drive Enclosures
      • 2.5" Enclosures
      • 3.5" Enclosures
      • Hard Drive Docks
      • Optical Disk Enclosures
    • Hard Drive Accessories
      • Hard Drive Adapters
      • Converters
      • Mobile Racks
      • Mounting Brackets
    • Audio + Video
      • Adapters
      • Converters
      • Docking stations
      • Headphones
    • Mobile Accessories
      • Stabilizer
    • Add-on Cards
      • Add-on I/O
      • Firewire
      • Serial ATA
      • Sound
      • USB
      • Network
    • Accessories
      • Cables
      • Card Readers
      • Hubs
      • Mobile
      • Network
      • USB Charging
      • USB I/O
      • Computer Accessories
    • Cooling
      • Case Fans
      • HDD Cooler
      • Laptop Cooler
      • System Cooler
    • Industrial Products
      • Industrial Hubs
      • Industrial Add-on Cards
    • Nvidia Accessories
      • Cables Accessories
  • Support
    • FAQ
      • Frequently Asked Questions
      • Knowledge Base
    • Media Center
    • Download Center
    • Where To Buy
    • RMA Center
  • About Us
    • Who We Are
    • Sitemap
    • Contact
  •  Products   FAQ
Home / Products / Hard Drive Enclosures / 2.5" Enclosures / NexStar® GX USB 3.0 Dual 2.5” SATA SSD/HDD RAID Enclosure
  • NexStar® GX USB 3.0 Dual 2.5” SATA SSD/HDD RAID Enclosure

    NST-272S3-BK

    For Two 9.5mm & 7mm 2.5” SATA SSD/HDD/Hybrid Drive 

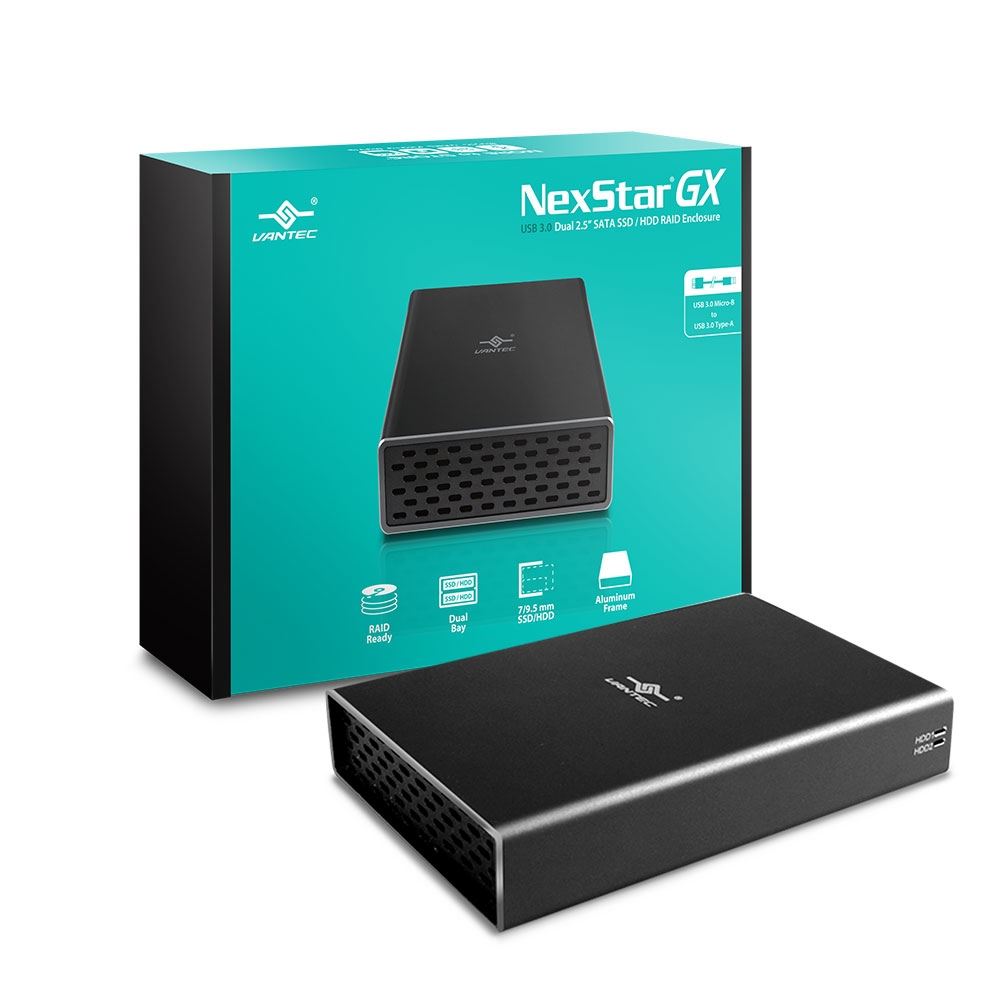
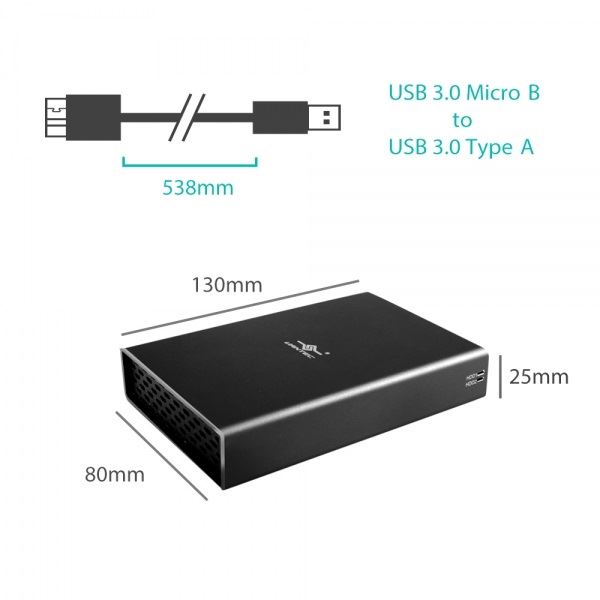
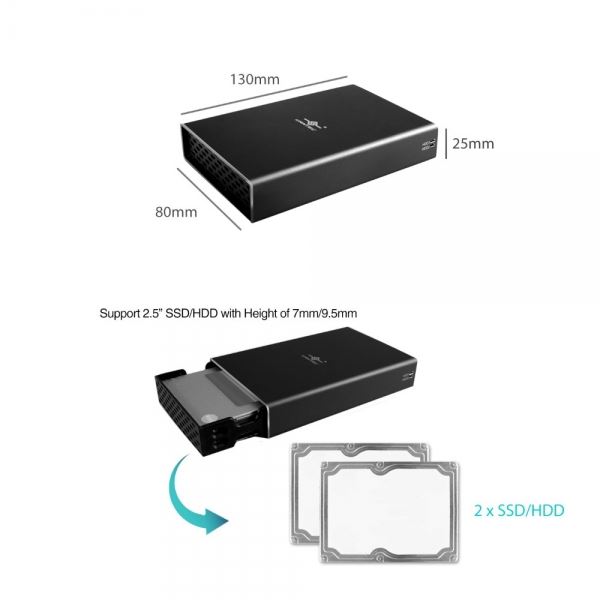
    NexStar® GX USB 3.0 Dual 2.5” SATA SSD/HDD/SDHD RAID Enclosure is a small, fast and simple way to expand and protect your data. Designed ideally for Solid State Drives, this compact form factor can house two Solid State Drives or Hard Drives for RAID capability.  This RAID in a box simplifies the configuration using JBOD (Individual)/RAID0/RAID1 mode, with these RAID mode you can decide for speed or/and redundancy for your storage like your precious family photos, music, video, and games. The sturdy drive cage protects your drives while the aluminum case and front vents effectively draws away the heat to keep your drives cool and improve performance. This Vantec NexStar® GX 2.5” will provide the performance in a RAID environment when couple with Solid State Drives.


    BUY NOW
    • fb
    • g+
    • tt


  • Highlight
  • Spec
  • Support
  • FAQ
  •  

    • Support Dual 2.5" SATAI/II/III SSD/HDD/SDHD 
    • Support JBOD(Individual)/RAID 0/RAID 1 
    • Auto RAID 1 rebuild
    • Support UASP 
    • SATA interface support SATAIII specification up to 6Gbps 
    • Capacity support over 2TB per drive* 
    • USB Micro-B connector to provide additional power 
    • USB 3.0 interface operates at Super Speed up to 5Gbps
    • LED indicators for Power ON/Standby, two drive activities and RAID configuration 
    • Aluminum housing with front vents for maximum heat dissipation
    • Power input with DC 5V/2A adapter. 
    • Support 7/8.1/10, MAC OS X 10.6 or above, Linux Ubuntu 10.4(Kernel 2.6.38) or above 
Model:  NST-272S3-BK
 
Device Support:  SATA I/II/III SSD/HDD/SDHD 
Device Size:  2 Bay for 2.5” 7mm and 9.5mm SSD/HDD/SDHDs
Internal Interface:  SATA
External Interface:  USB 3.0 Micro-B
HDD Capacity:  2TB per bay, for a combined total of 4TB.
Power Supply:  AC Adapter 5V, 2A; Micro USB to A, length: 23 inches
Material:  Aluminum and ABS (Plastic)
Dimension:  130(L) x 83(H) x 25(W) mm
Length of USB cable:  23 inches / 584mm 
Weight:  300g ( 10.6ozs) main unit
 
System Requirements:
• Windows 7/8.1/10, MAC OS X 10.6 or above, Linux Ubuntu 10.4(Kernel 2.6.38) or above 
• Available USB 3.0 port
 
What's Included: NexStar GX USB 3.0 Dual 2.5” SATA SSD/HDD RAID Enclosure, AC Adapter + cable (Micro USB to A), USB 3.0 Cable (USB 3.0 Micro-B to A), Set of installation Screw, Enclosure Stand, Quick Installation Guide


UPC:  844767022710

EAN:  4716872103102

Driver

Manual

Connection problem due to Power issue with Dual Bay 2.5" RAID enclosure, NST-272S3-BK [#05022019]

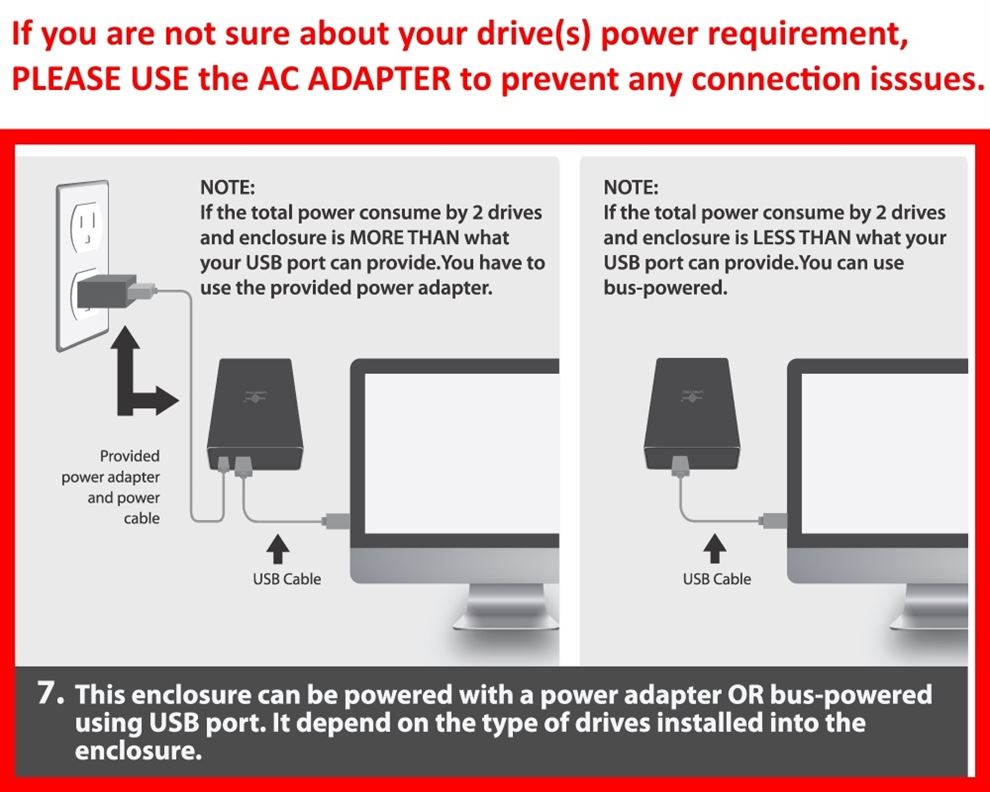
  • If you are experiencing connection issue, like drop connection, cannot recognize the second drive, unable to format drives or another strange symptom, make sure you are using the provided ac adapter.

    This is caused by your drives drawing too much power from your USB port and your USB port cannot provide enough power to the drives.

    We have found out current newer SSD (per drive) and HDD (per drive) power requirement are exceeding the power of one USB port as a result the provided AC Adapter is required.

LED status for NST-272S3-BK [#05202020]

  • During normal operation with RAID or non-RAID configuration:

    Normal LED function:


    HDD 1 LED

    HDD 2 LED

    HDD Power

    Power

    ON

    ON

    ON

    HDD 1 Disk Access

    Random Blinks

    SOLID ON

    ON

    HDD2 Disk Access

    Solid ON

    Random Blinks

    ON

    No Disk Access

    SOLID ON

    SOLID ON

    ON

    Sleep Mode

    OFF

    OFF

    OFF

    PC Power OFF

    OFF

    OFF

    OFF

    USB Ejected

    OFF

    OFF

    OFF


    For Individual Mode operation, LED (blue) function:


    HDD 1 LED

    HDD 2 LED

    HDD 1 Disk Access

    Random Blinks

    SOLID ON

    HDD2 Disk Access

    Solid ON

    Random Blinks

    HDD 1 Defective

    LED OFF

    LED ON

    HDD 2 Defective

    LED ON

    LED OFF


    For RAID 1 Mode operation, LED (blue) function:


    HDD 1 LED

    HDD 2 LED

    RAID 1 Degraded (HDD 1 bad)

    LED OFF

    LED ON (Normal, blink during disk access)

    RAID 1 Degraded (HDD 2 bad)

    LED ON (Normal, blink during disk access)

    LED OFF

    RAID Rebuild

    LEDs blink during the rebuilding

    LEDs blink during the rebuilding

    RAID Rebuild Complete

    LED ON, Random blink, back to normal

    LED ON, Random blink, back to normal


    For RAID 0 Mode operation, LED (blue) function:


    HDD 1 LED

    HDD 2 LED

    RAID 0, Normal, No Disk Access

    LED ON

    LED ON

    RAID 0, Normal, Disk Access

    LED ON, blink during disk access

    LED ON, blink during disk access

    RAID 0 (HDD 1 bad)

    LED OFF or SOLID (depend on the drive)

    SOLID ON

    RAID 0 (HDD 2 bad)

    SOLID ON

    LED OFF or SOLID ON (depend on the drive)


    RAID Dip switch and RAID LED setting:

    To change Mode, turn on the unit with drives, change the Dip Switch, and hold the reset button for 3 seconds.
    Note: Change mode will erase all the data on the drives.

    RAID Mode

    Dip Switch

    LED

    Normal

    Down  |  Down

    ON  |  OFF  |  OFF

    RAID 0

    Up  |  Up

    OFF  |  OFF  |  ON

    RAID 1

    Up  |  Down

    OFF  |  ON  |  OFF


Setup RAID on NST-272S3-BK [#33304]

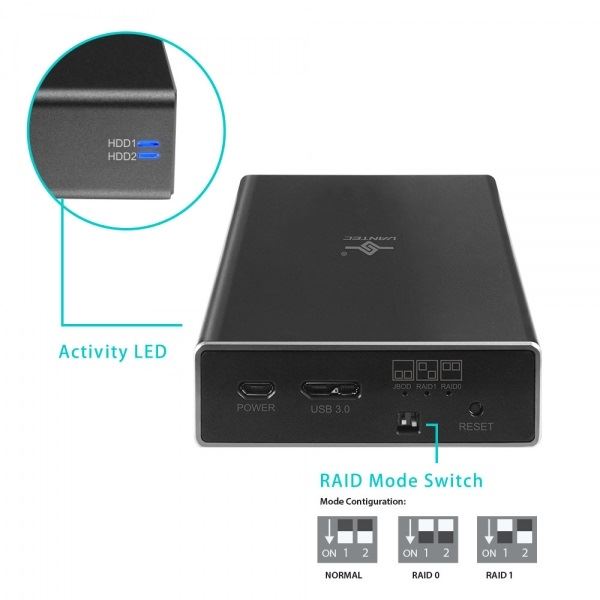
  • Here are the steps to setup RAID on the NST-272S3-BK.

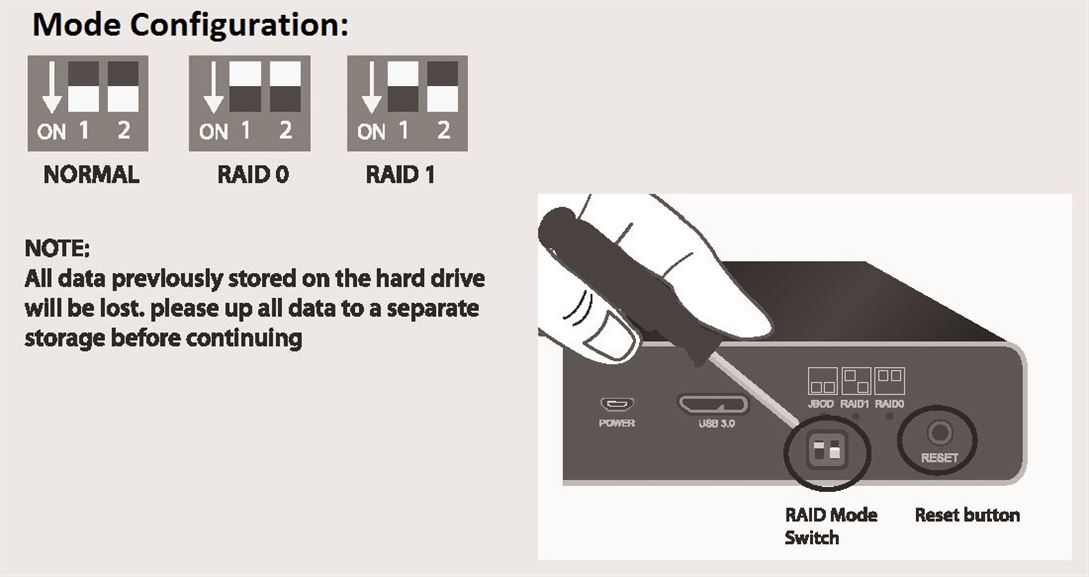
    1) Power ON your system, wait for the system to be fully booted up

    2) Use a pen tip to change the RAID switch to the right setting

    3) Power up the unit, plug in the USB cable to your system

    4) Wait for the drive to spin up if this is HDD, If SSD go to the next step

    5) Press and hold the reset button for 3 seconds (HDD LEDs will turn off)

    6) Release the reset button and the built-in RAID controller will activate the RAID Mode based on the RAID dip switch setting

    7) The RAID is now ready to be initialize, partition and formatted for the Operating System you are using before it can store data

    8) For Windows, use Disk Management. For OS X, use Disk Utility

    For detail instruction refer to the FAQ "How to preparing a New storage, Hard Drive, or SSD for use with a system?" 


Is Vantec USB Enclosures/Docks compatible with Windows 10 operating system? [#33401]

  • Yes, all our USB Enclosures and Docks are compatible with Windows 10 Operating System. Just plug into any USB port on your Windows 10 system and it should function just like your older OS. You do not need to update any firmware or drivers. It is plug and play.

What is the Maximum Capacity Hard Drive can I install into the enclosure or Dock and Power Requirement of the drive? [#33402]

  • Please note the following requirement for USB enclosures, eSATA enclosures and Docks. 

    For Enclosures:

    It can vary depending on the age and type of the Enclosures.

    2.5" SATA drive, USB enclosures:
    The maximum capacity is 4TB or more for the current shipping model as of this writing (Feb 5, 2020). Please write to support@vantecusa.com for further help or questions.

    2.5" SATA drive, eSATA enclosures:
    Please check with your system manufacturer on the eSATA port, some system eSATA may only support 2TB drive. Our eSATA enclosure maximum capacity is 4TB or more for the current shipping model as of this writing (Feb 5, 2020). Please write to support@vantecusa.com for further help or questions.

    Please READ these Limitation: 

    1)  For 2.5" SATA drive, Maximum Capacity alone is not the only thing you have to check, the other important criteria are the thickness of the drive. If your 2.5" enclosure will only fit a drive with the thickness (or height) of 7mm drive, trying to put a 9.5mm thickness drive into the enclosure will not fit.

    2)  The power requirement of the drive is also very important. Most drives are designed for installing into the systems with unlimited power. If you purchase a big capacity drive with power requirements that exceed the power your USB port can provide, it will not function. This is the fault of your USB port lack of power and your power hungry drive, not the enclosure issue. The enclosure uses minimum power. Your Drive plus the enclosure MUST not exceed the power capability of your USB port.

    3) Support AF or 512e drives only, do not support 4Kn drives.


    3.5" SATA drive, USB enclosures:
    The maximum capacity is 16TB or more for the current shipping model as of this writing (Feb 5, 2020).
    It is maybe 2TB for an older or discontinued model. You can also write to us for help concerning an older enclosure(s) capacity. Please write to support@vantecusa.com for further help or questions.

    3.5" SATA drive, eSATA enclosures:
    Please check with your system manufacturer on the eSATA port, some system eSATA may only support 2TB drive. Our eSATA enclosure maximum capacity is 12TB for the current shipping model as of this writing (Feb 5, 2020). Please write to support@vantecusa.com for further help or questions.

    Please READ these Limitation: 

    1) The power requirement of the drive is also very important. Most drives are designed to draw less than 13 watts per drive. The enclosure uses minimum power and the ac adapter that comes with the enclosure are designed for most standard power requirement of the drives. If you purchase drives that draw too much power (greater than 13 watts) and exceed the specifications of the enclosure ac adapter, it will not function correctly. Please check the label on the drive for the power specifications. If your drives exceeded the limitation, you may have to purchase a bigger ac adapter for your needs, please contact Vantec Support for sizing the ac adapter for your needs and to purchase optional bigger ac adapter. 

    2) Support AF or 512e drives only, do not support 4Kn drives.


    Older 2.5" or 3.5" IDE drive, USB enclosures:
    If you are using an older USB enclosure for IDE drive, generally for 2.5" IDE, USB enclosure it is 320GB and for 3.5" USB enclosure is 750GB. 


    For Docks:

    It can vary depending on the age and type of interface of the Dock.

    Docks are designed for 2.5" or 3.5" SATA Drives, for current shipping docks as of this writing (Feb 5, 2020), 2.5" SATA HDD/SSD, the capacity ranges from 100GB to 4TB, and for 3.5" SATA drive, it is 500GB to 16TB.
    Please write to support@vantecusa.com for further help or questions if you are not sure.

    Please READ these Limitation: 

    1) The power requirement of the drive is also very important. Most drives are designed to draw less than 13 watts per drive. The dock uses minimum power and the ac adapter that comes with the dock are designed for most standard power requirement of the drives. If you purchase drives that draw too much power (greater than 13 watts) and exceed the specifications of the dock ac adapter, it will not function correctly. Please check the label on the drive for the power specifications. If your drives exceeded the limitation, you may have to purchase a bigger ac adapter for your needs, please contact Vantec Support for sizing the ac adapter for your needs and to purchase optional bigger ac adapter. 

    2) Support AF or 512e drives only, do not support 4Kn drives.


    For ALL DISCONTINUED products, please check the specifications on the product page. 


How to prepare a New Storage, Hard Drive, or SSD for use with a system? [#33406]

  • There are two set of instruction. One for Windows OS and another for OS X. Please use the right set of instruction for your System.


    >>>>>> 1) Preparing a new hard drive for use with Windows 7/8/10 OS <<<<<<


    NOTE: If you have important data on this drive, DO NOT go any further, please backup your data before you continue. These steps will erase ALL your data on the drive.


    For Windows 7, hold the Windows logo key on your keyboard and press “R” (Winkey+R). This will launch the Run the utility. Type “diskmgmt.msc” inside the text box and press Enter. This will open the Windows Disk Management utility. This is where you can format, create, and delete hard drive partitions.


    For Windows 8/8.1/10, hold the Windows logo key on your keyboard and press “X” (Winkey+X). This will launch a popup window and select disk management.


    Usually, the Initialize Disk Wizard will appear automatically when you open Disk Management. If you have more than one blank drive that needs to be initialized it will list them. Make sure that there is a check in the box of the drive that needs to be initialized, select check MBR if your hard drive is smaller than 2TB, if it is greater than 2TB, please check GPT and then left-click on the Ok button. If the wizard does show up, go to step 5. If the wizard does not show up, please see the note and additional images directly below.


    STOP   Critical: If your hard drive is greater than 2TB in capacity, you need to use check GPT(GUID Partition Table), if it is smaller, select MBR. 


    NOTENote: If you do not see the Initialize Disk wizard, manually start the initialization. The drive that needs to be initialized should have a little circle with a red arrow pointing down like in the image below.


    Image


    When you find it. Right-click on the red arrow and choose Initialize Disk.


    Image


    There are two mode of initializing a new drive using MBR or GPT. If your hard drive is greater than 2TB, you need to use check GPT, if it is smaller, select MBR.


    The drive is now initialized. The disk should have a black bar and say that it is Unallocated. You should now be able to create a partition and format the hard drive.


    Image


    Now right click the unallocated space and click create a New Simple Volume shown below:


    Follow the on screen wizard by clicking Next


    6140ced0ed5c4af9bb3f4e2.png


    Specify your volume size, if you are not sure use the default, and now click Next


    d12075fe11cf486a8c71aaf.png


    Assign a drive letter to the drive, if you are not sure use the default and click Next


    584018838e134ecea7380b0.png


    Format the partition and name the volume, if you are not sure use the default


    7f18d8fde76b4e2a842e50e.png


    Now click Finish and it will start formatting the drive to get it ready for use.


    647d38c3616c4b1fb67fdc0.png


    Once the formatting is done, your system will report the presense of a new drive with an assigned drive letter. You can begin using the storage.


    >>>>>> 2) Preparing a new hard drive for use with Apple OS X <<<<<<


  • Follow us for all the latest news, tips and updates.

    • Shop Vantec
    • Privacy Policy
    • Term of Use
    • Contact
  • © 2017 Vantec Thermal Technologies.
Top